
Check-In
The main functionality of the application is to allow users to perform check-in at the office. It is possible to do this by clicking the Check-In button on the Home page or directly by accessing the Check-In Page from the main menu.
First, the user must choose the desired building. A building can be marked as favorite by clicking on the heart symbol displayed in the upper right corner.

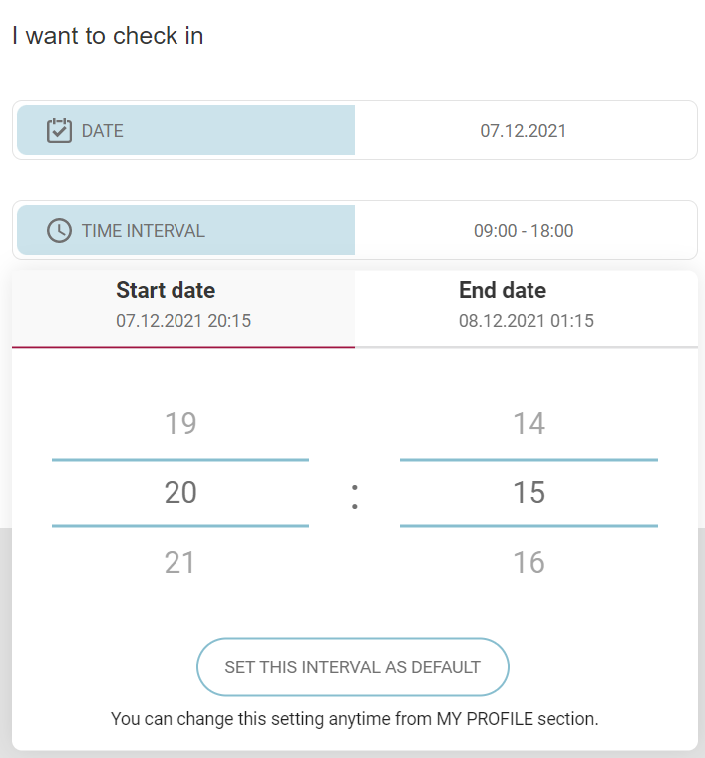
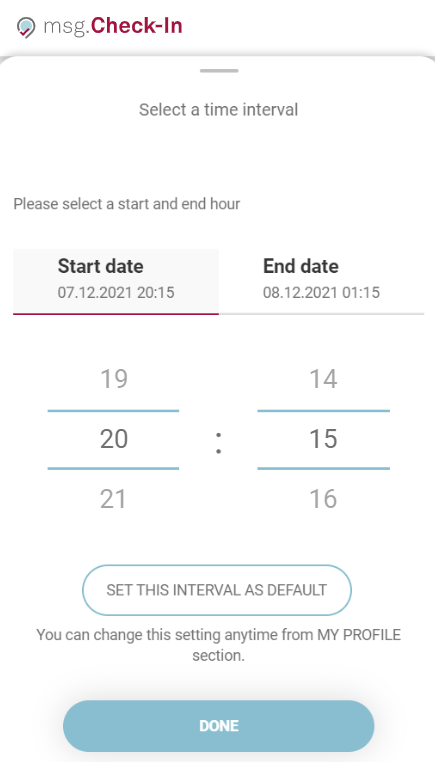
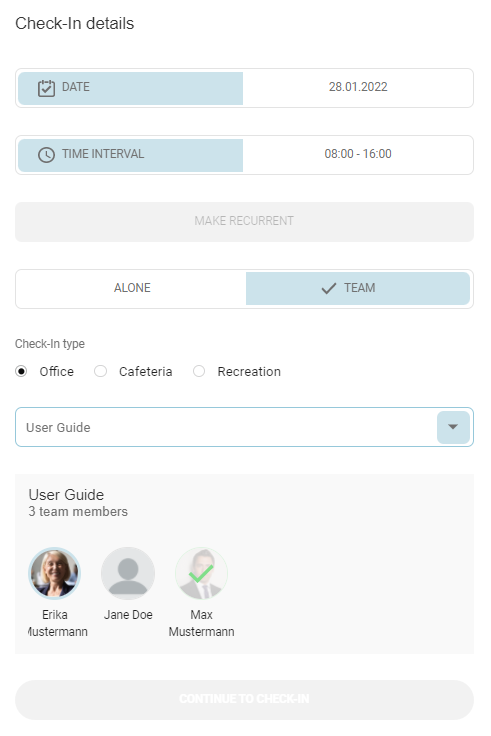
After this step, the user lands on a screen where they can set the details for the check-in. In order to create a check-in, a user must choose a day from the calendar. After choosing a day, the user can check in for the entire workday (8 hours) or choose a time interval. The user has the possibility to select the start time and the end time of the check-in by pressing the Time Interval button. In order to choose the desired time, the user must scroll up and down in the hours and minutes slots (on desktop, he/she can also click on the desired hour/minute). If the user chooses a time that is for the next day, the end date will be automatically updated. The chosen time interval can have a minimum duration of 1 minute and a maximum duration of 24 hours.
The selected time interval refers to the building's time zone (i.e. if the building is set in the Europe/Berlin time zone, then a check-in from 09:00 till 18:00 in that building will be created taking into this interval regardless of the time zone where the user is located).
When the user enters for the first time the application and goes to the check-in process and opens the time interval picker, the "Set this interval as default" button can be observed. This button remains there until the user clicks on it and saves a default time interval, after which it disappears. The user can also configure a preferred time interval for the check-ins or change an already saved time interval in the "My profile" section.
On mobile devices this information is displayed in a drawer:
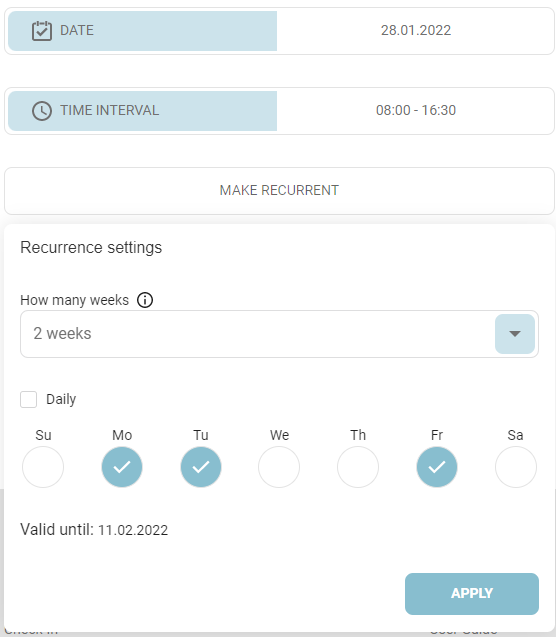
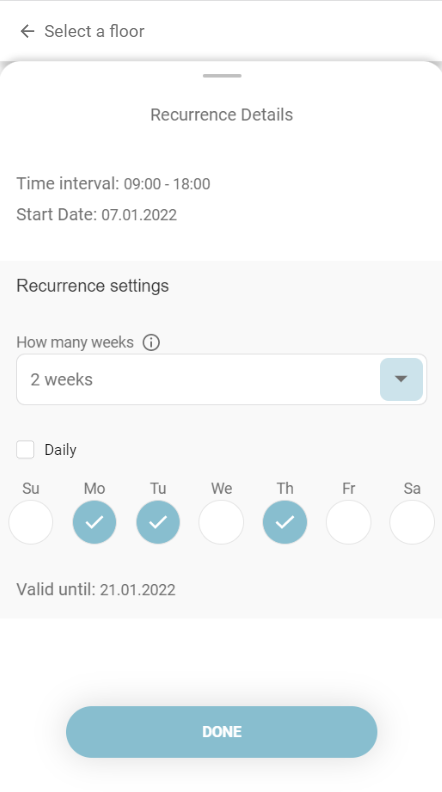
After selecting the time interval, the user has the possibility to prepare the settings for a recurrent check-in series, being able to book a place for multiple days or even a month in the future. By pressing the Make Recurrent button, a popup opens. Inside it, the user can select the number of weeks for recurrence, which depends on the date offset set by the building admin (default is one week and the maximum is 4 weeks), and select the weekdays in which they want to create the check-ins. The user is also able to see the date until which the recurrence is valid. After clicking on the Apply button, the Make Recurrent box will contain the recurrence period and a trash bin, which allows the user to delete the recurrence settings. The recurrent check-in series can be created only for single check-ins.
On mobile devices, the recurrence settings are displayed in a drawer:
If you can't see the "Recurrent" button, it's because the building admin has deactivated the Recurrent Check-in feature. This means that you won't be able to create recurrent bookings in that building anymore.
If the user does not want to create recurring check-ins, he/she has the option to perform the check-in either alone or as part of a team. If the user wishes to perform a group check-in, he/she can click on the Team button, next to the Alone button.
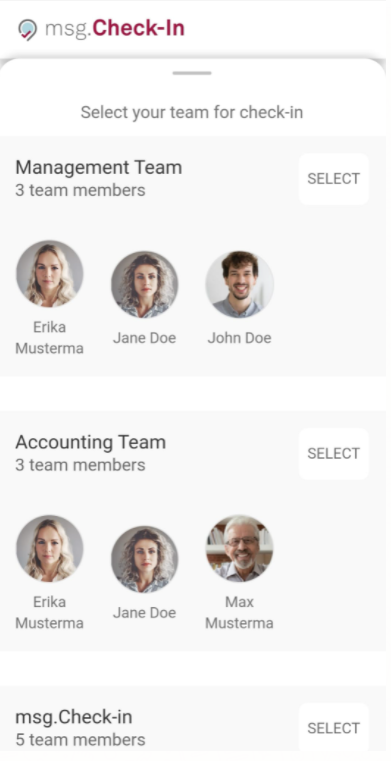
Selecting the team check-in involves choosing the type of check-in (office, recreation or cafeteria) and the team. If the user is part of multiple project teams, a drop-down list will enable him/her to view all the teams and select the desired one. After choosing the team, a list with all the team members from that particular team will be displayed, allowing the user to choose one colleague at a time in order to start the group check-in process.
On mobile devices the team selection is displayed in a drawer:
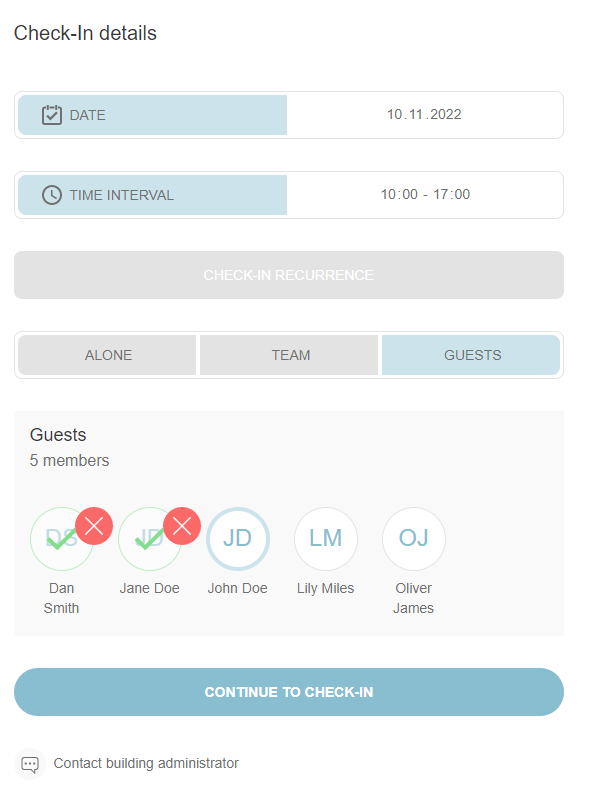
In case the user has the role of Front Desk Admin, they will have the possibility to create check-ins for their guests. The flow is similar to the one associated with the team check-in. Meaning the administrator will see all the created members as part of its guest team and he/she will have the possibility to place one by one, each member, on the available green pins from the zone plan and then continue with the steps necessary for a check-in to be created.
Moreover, the user has the possibility to filter the places based on a set of preferred equipment associated with that building. By clicking on the "Filter by equipment" button, he/she can select from one to all the existing equipment, and then he/she will be able to navigate only to those floors and zones in the building that has the selected equipment attached to the places. Moreover, in the modal, the user can search for a type or name of the equipment.

On mobile and tablet devices, the information is displayed in a drawer:
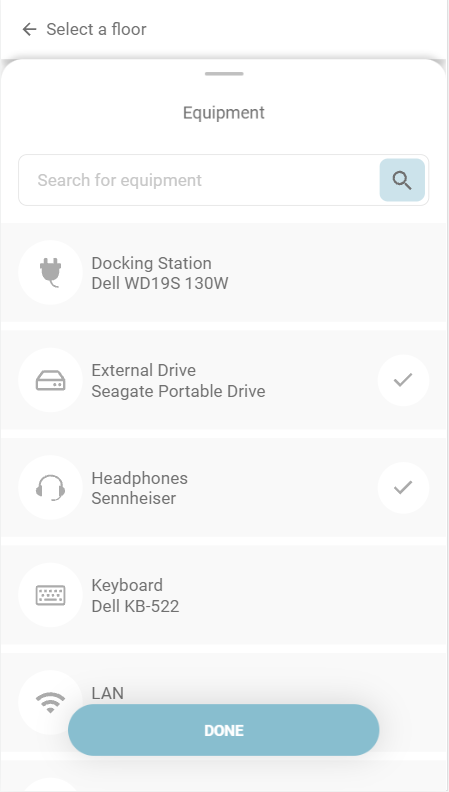
On the building level, if there is not any of the searched equipment on a floor, the floor is greyed out. On floor level, the zones which do not contain the searched equipment are greyed out. On zone level, the places which do not have the searched equipment attached are greyed out.

The chips with the selected equipment will be visible on each level of the browsing process to show the user the criteria by which the selection was made. The user has the possibility to clear all the filters by clicking on the "Clear all filters" button.
After selecting a floor and zone, the user can start clicking on the pins in order to choose a specific place. In an office building, there are three types of places: normal workplace in the office (laptop symbol), place in the cafeteria (coffee cup symbol) and place in the recreation room (gaming symbol). In addition, people with disabilities can have dedicated places marked with a wheelchair symbol.
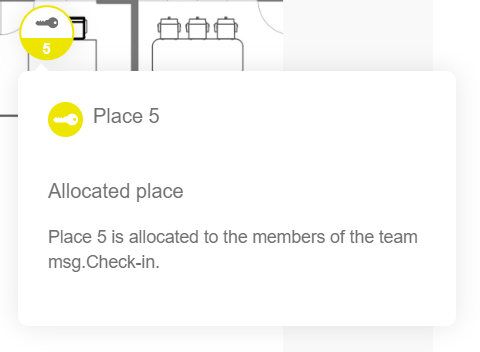
Some users have allocated places, which means that the allocation admin has set up a place exclusively for each of them. In this case, pressing the Check In button, either from the menu tabs or from the Home page, will redirect the user directly to the zone where he/she has an allocated place. The place is also preselected for the check-in; the user only needs to adjust the desired date and time interval. A user with an allocated place can change his/her place at any time by selecting another place on the zone map. He can also navigate to other buildings/floors/zones by selecting one of the links above the map in case of desktop version or by clicking the “Go to buildings” in case of mobile devices.
The allocated places are marked on the map with a key symbol to inform the users about this special type of place. In addition, allocated places also display a specific color assigned by the allocation admin to differentiate the seats dedicated to specific departments. If the place is allocated to someone, the user's avatar appears instead of the key symbol, to also mark the person to whom it was assigned (exception in this case are the private profiles where only the picture placeholder is being displayed). If the user selects an unallocated place or a place allocated to him/her, he/she can view the equipment available for it and proceed with the check-in process.

Additionally, a zone can be assigned to a specific team. Places within that zone that are allocated to the team are also marked with a key symbol. If a user is a member of the assigned team, they can select one of the allocated places and proceed with the check-in process. However, if the user is not part of the team, upon clicking on a place, they will encounter a popup message stating that the place is already assigned to the team "Name" as visible below:
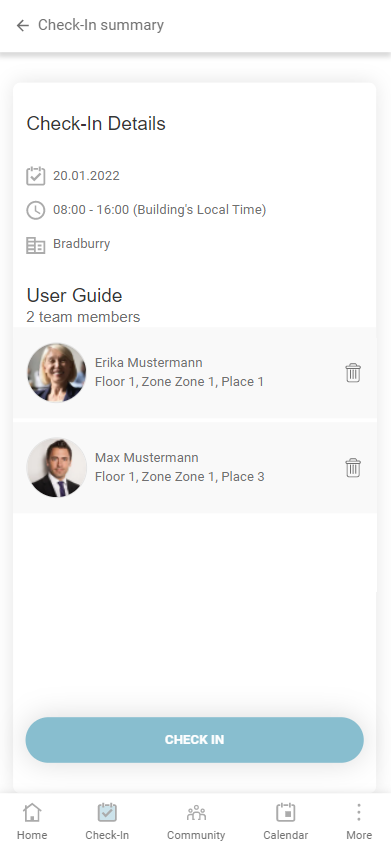
Once the user decided on which place from the map he/she wants to check in, he/she can eventually select that place and click on the Continue to check-in button.

Before the final confirmation, the user can view the details of his/her check-in on a summary page. In case of team check-in, the user has the possibility to delete the previously selected colleagues. If the parking feature is available and the check-in is an office one, after pressing the Check In button a confirmation pop-up will appear asking the user if he/she wants to continue with creating a parking check-in. Otherwise, after pressing the Check In button, a success toaster will appear. The created check-in will be visible on the Home page under the Future Check-Ins tab and on the Calendar page, under the My Calendar tab.

In the case of recurrent check-ins, the user can see the selected time interval and the weekdays on which they want to create the recurrent series. After pressing the Check In button, if there are no recurrence issues, the success pop-up (the user will have the possibility to continue with recurrent parking)/toaster will appear here too. Otherwise, a new section will be present on the summary view, containing the recurrence issues, more exactly the seats which cannot be booked due to occupancy problems. During this step, the user has the possibility to change those seats by clicking the Change Places button, or he/she can ignore them by clicking on the Ignore All button.
If the user has already created some check-ins for the future that interfere with the recurrent series, in the Check-In summary view, he/she will be able to see a new section called Already created check-ins, containing a list of check-ins with their dates and booked places.

If the user clicks the Ignore All button, the success pop-up/toaster will appear.
If the user clicks on the Change Places button, he/she can navigate through the issues and can solve them by ignoring them or by choosing another seat.

After solving all the issues, the user will be able to see the changed places and the ignored issues on the summary view and the Check In button will become active. By pressing it, the success pop-up/toaster will appear.
The user will be able to see his/her recurrent check-ins in the Future Check-Ins section and in the My Calendar tab.
An additional feature is the Parking Check-In. This feature is available if your Administrator enables it. The Parking space booking flow is similar to the check-in flow and follows the same rules. A difference is that the Team check-in option is not available for the parking check-in. In case the user has the Front-Desk Admin role he/she can also proceed with the creation of parking check-ins. The Front Desk Admin can use the special type parking spaces marked as "guest" places in order to create parking check-ins for the externals or he/she can use the normal parking places which are available for all employees. Employees can only book the normal parking places but the guests can be checked-in on both types of places.
A parking check-in is confirmed if the associated workplace is confirmed by the user. All parking cards from Today's Activity section will not contain the "Confirm" button as they cannot be confirmed separately from the associated office place.

If a user is already checked in for the selected date and time interval, when clicking on a different place, the pop-up for entering the edit check-in flow will be displayed:

After clicking on Edit, the user will be navigated to the edit flow. This flow is very similar to the check-in one, except it allows the user only to modify a check-in's date, time interval or place.

When clicking on "View Changes", a summary as described above is displayed, stating the changes user made to the existing check-in. By clicking "Save Changes", the check-in will be updated and its new information will be displayed in the application.

Mark a zone as favorite
Within the check-in process, while in the map view of a specific zone, you have the option to designate it as a favorite. By choosing a zone as a favorite, you streamline the check-in experience, automatically directing you to that specific zone and bypassing the need to manually select the building, floor, and zone during the check-in process. The designated favorite zone will also be conveniently displayed in the "Manage Profile" section. To remove a favorite zone, you can either utilize the designated button on the map view or employ the "trash" icon within the "Manage Profile" section.


Check in using a QR code
Simplify your office check-in procedure with the efficient QR code scanning feature. If the feature is enabled by the building admin users can now effortlessly check in at the office by scanning a QR code conveniently positioned on a desk. This feature has been designed to streamline the check-in process, providing a seamless and enhanced user experience.
Here's an illustration of a place sticker:
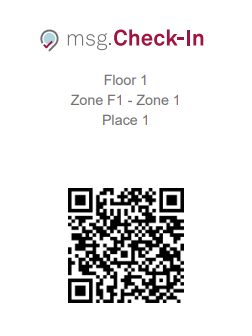
The process is as straightforward as capturing the QR code with your smartphone's camera. This immediately guides you through the check-in process, where essential details are already pre-filled for your convenience. The designated location is selected, and the check-in time interval is automatically set to commence with the upcoming hour closest to the present time. Additionally, the check-out time aligns with your default end time based on your present set-up intervals in the settings menu.
If the selected location is unavailable for check-in due to factors such as occupation by another colleague, allocation to a different individual, removal from the app by the building administrator, or other reasons, users will encounter a popup. This popup will provide information about the exception and guide users on the appropriate steps to take next.