
Event Management
Events are an important feature that enables users with the special role of "Event Planner" to schedule and manage activities within a building or in an external location. When establishing an event, the user should consider the following basic information:
- Events have the highest priority among all other types of check-ins. When an event is created, all existing check-ins in the selected rooms and floors will be deleted, and users will be notified of this action.
- An event can take place in a single building but can extend across multiple floors and rooms.
- Events can be planned also outside of the company buildings, in other locations that do not require seat plans.
- Events can be scheduled for a maximum time interval of 24 hours. If the same event occurs on multiple days, the original event with all attached information can be duplicated for subsequent dates.
- Multiple admins can be designated to help manage the event. Only users with the role of "Event planner" can create and manage events.
- Event planners can opt for ticket generation process for their events, meaning that each registered user will receive an individual ticket with a QR code, which must be validated to participate to the event.
- Events can be designated as public, allowing anyone in the company to register, or private, requiring users to be on the guest list to register.
- Events can be activated, allowing users to see and register for the event, or they can be inactive, meaning they are still in draft mode and not visible to others.
- Event planners can choose the target group which will be notified about the new event so that only those who need to know about the upcoming event, actually receive the announcement.
Manage Events - Event Planner view
Users with the role of Event Planner have access to a dropdown on the Events feature tab. By accessing the Manage Events tab, the Upcoming Events will be displayed in the form of cards with the most relevant details attached. In addition to the details, shortcut buttons can be found on the card for actions like edit, activate/deactivate, and delete. In the top left corner of the page, beneath the menu, a navigation tab component allows the user to access the Past Events page. This page represents an archive of all the past events from the company in the same form of cards with details but without any shortcut buttons and actions possible. Past events cannot be deleted and can only be viewed for details.

Clicking on an event card reveals a preview page with basic and essential information about the event, such as:
- Event name
- Event picture
- Date
- Time interval (based on the building's local time)
- Building name
- Selected floors
- Selected zones
- Recommended participant count (calculated from available spaces in the selected zones)
- Event description
- Confirmed participant count (number of people already registered for the event)
- Option to download a CSV file containing the list of registered participants
- Notification type
- List of event admins
- Event type (private or public)
- Guest list (if the event is set to Private).
The lower right section of the window also features the action buttons from the initial card for the user's convenience, should they wish to make changes from the preview page.

Add a new event
By pressing the +Add Event button, the creation event flow is started. This process consists of three steps: providing details, specifying the location, and publishing.
In the first step, the user must enter the date, time, title, and description of the event. Optional fields include a subtitle and a photo. By default, the current event planner appears in the event admins section, but additional admins can be added by selecting names from the dropdown menu. Users can upload a photo using the file system search or drag-and-drop option. Events can only be created for the present or future dates.
Event planners have the flexibility to create events that require ticket validation. To enable this functionality the "Generate Ticket" option must be checked when setting up the event. This will ensure that attendees are required to present a valid ticket for entry.
Once all required fields are completed, the "Next" button becomes active, allowing the user to proceed to the second step of event creation.

The second step represents the location selection. The event planner has the option to either choose an existing building or to create the event in another location, outside the company. By default, the option "Office Buildings" is selected, meaning the possibility to create an event within an existing office facility. The dropdown menu also offers the choice of an "Other Location" event type.

1. Office buildings
If multiple buildings are available, then the selection will start at the building level. An event planner can choose a building and then select which floors and/or zones he/she wishes to book for the event. If the event planner desires to book the entire building, he/she can simply click on the Select Entire Building button, located in the upper left corner of the selected building card. The "Back to buildings" button allows the user to return to the building selection level.

This step is especially important in the event creation process because events cannot overlap for the same date, time, and location. If buildings, floors, or rooms are already booked for the specified details, the user will receive pop-up notifications or warning messages indicating that booking is not possible:
- In case the entire building is already booked:

- In case one or more entire floors are already booked:

- In case of particular zones are already booked:

2. Other location:
Users can also organize events outside company facilities in locations without building plans. To do this, after selecting the "Other location" option from the dropdown menu on step two, the user must enter the venue's maximum participant capacity, time zone, and an exact address. As there are no more plans and seats available, the application cannot calculate the maximum number of participants, so the user is responsible for determining the limit. Once the maximum number of registration is reached, others will no longer have the option to register for that event.
For the address field, it is advisable to limit the number of rows to a maximum of 5. This restriction ensures that the text entered does not affect the layout and generation of the ticket.
All three fields are mandatory fields and must be filled by the event planner in order to navigate to the third step.

The third step includes a brief preview section followed by a small part of the final configuration. In the configuration section, the event planner can customize the events depending on the needs:
- An event can be designated as public, open to everyone, or as private, restricted to a specific guest list
- An event can be saved as active, meaning they are visible or inactive (draft mode), in case editing is still required
- Notifications for new event announcements can be configured to be sent to all employees, by location, or not sent at all
Once the event is configured as desired, the user can press the "Publish" button to create the event.

Possible use cases when choosing the event type under step three:
- Private events: These events are intended for situations where only a specific target group should have visibility and access. Examples include workshops for specific individuals, client visits with limited employee involvement, training sessions for certain groups, or any other occasion not meant for all employees.
- Public events: Created to be visible and announced to the entire company, these events encompass occasions such as office parties held within the building or other locations, or any large-scale event where the target audience is not a small, guest-listed group, but rather the entire organization.
Edit Event
The event editing process follows the same steps as event creation. The existing event data can be modified as needed. Event planners must carefully change the date, time, and location to ensure the event fits into an available slot not already booked by another event. All event details can be altered, except for the event type (public events cannot be changed to private and vice versa) and the ticket generation checkbox (once an event requires ticket validation, this option cannot be changed and vice versa).
Delete Event
To remove an event from the upcoming event page, event planners can use the shortcut bin button on the card or press the "Delete" button on the specific event's preview page. Upon deletion, a modal appears requesting the reason for the event's removal. Providing a reason is mandatory, as it will be included in notifications sent to all users who have checked in to the event, informing them of the event's deletion.

Deactivate Event
Deactivating an event erases all existing registrations, and users will be notified accordingly. After deactivation, the event will no longer be visible to end users but will remain accessible to the event planner. If there is a possibility that the event may occur at a later date, it is better to deactivate rather than delete it, as all data about the event remains saved.

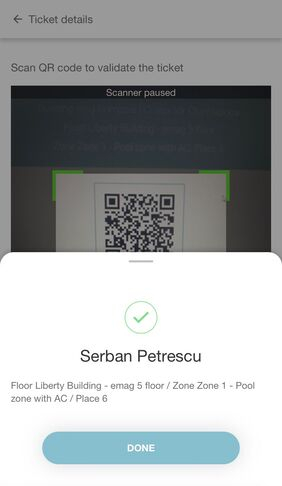
Scan QR
For events that generate tickets, an additional action called "Scan QR" is available on the preview page of the event. By clicking on this action, the event planner can initiate the scanning process for the tickets.
During the scanning process, if the ticket validation is successful, a popup message or a drawer (on mobile devices) will appear to indicate the successful validation. This feedback confirms that the ticket is valid and can be used for entry.
However, if the ticket validation is unsuccessful, the popup or drawer will display an appropriate message to inform the event planner about the issue.
The event planner can repeat this process until all tickets have been successfully validated.
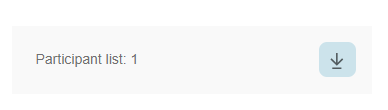
To provide event planners with a comprehensive overview of participants and track the variance between booked places and validated tickets, the event planners have the option to download a CSV file containing this information. This section is called Participant List and is located on the Preview page of the event.
Duplicate event
The duplicate event option assists event planners who need to replicate an event for multiple days. All information stays the same, with the only required change being the date. After selecting a new date, the event planner simply presses the "Next" buttons, and in step three, the "Publish" button.

View Events - End User view
Under the Events Tab, users can view upcoming events displayed as cards. Each card showcases essential event details, such as title, date, time, and location. A toggle button in the top left corner allows users to filter events by location or view all available events.

If you want to see more information about a particular event, you can click on the card to open it. Here, you'll find information about the recommended number of participants, a detailed description of the event, and any other important information.
Clicking on a card provides additional information, including the recommended number of participants and a comprehensive event description. To register for an event, users can click the Register shortcut button on the card or the details displayed, leading to the Event Details page. This page contains essential event information and a Select a Place to check-in section, where users can navigate the building and register on a place in the same manner as office check-ins.

Upon selecting a free place, the Register button is enabled, and when pressed, the user is redirected to a Summary page. After confirming the details, users can check in and proceed with the parking check-in flow (if available).

For events outside company buildings, users do not need to choose a place from a zone map. Instead, clicking the Register button secures their spot at the event.

After registering for an event, the entry appears in the user's personal calendar, alongside available actions such as unregistering, returning to the event details page, and adding a parking spot (if not done during registration). A special event icon differentiates the event from regular office check-ins in the user's personal calendar section.

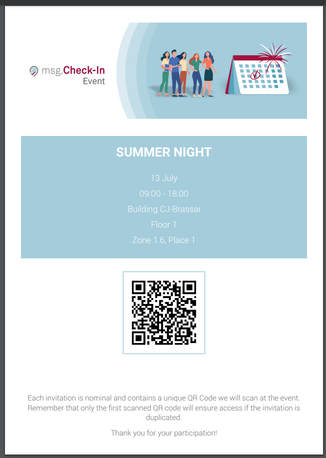
Upon completing the registration process, if the event requires ticket generation, on the Calendar page the users will have access to the generated QR code specifically for the event. Additionally, users will have the option to download their ticket by clicking on the "Download ticket" button. This allows them to conveniently obtain a digital copy of their ticket for future reference or printing if needed.

The ticket is a A4 PDF file, which contains the event details and the unique QR code. Please make sure to present it at the entrance of the event to be validated by the event planners.
Registrations are visible on the home page of the application and under the "Events" tab. Events with registrations are listed first in the list of available events for easy access. To unregister from an event, users can click the "Unregister" button on the event card or access the detailed view for more actions. The type of button present on the event card also shows to the end user, the events at which a registration already exists, but also the events where a registration is pending and the "Register" button is still present.

When an event reaches maximum capacity and no subscriptions are available anymore, the "Fully booked" status is displayed on the card under the View Events section, indicating that no more registrations are possible.

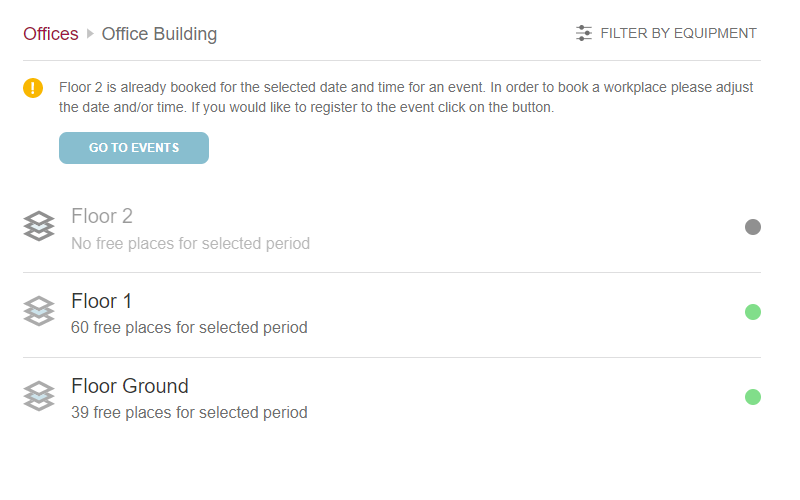
The events feature also impacts the office check-in flow. Users cannot create office check-ins in buildings, floors, or zones reserved for events, and warning messages will appear. Users can either choose another building/floor or zone or register for the event by clicking the "Go to Events" button.
- If an entire building is booked by an event:

- If an entire floor is booked by event:
- If some of the zones are booked for an event:

