
Workplace Management
The users who have the role Building Admin/Allocation Admin have access to an additional menu feature, Workplace Management, where the entire building management can be done. In case the user only has the allocation admin role, this feature is visible in case they were named as admins for at least one enabled zone. When accessing this menu item, all buildings which are managed by the admin are displayed. Depending on the activation of the Parking functionality by the System Administrator, one or two tabs are available: one for Office Buildings and one for Parkings. All the functionalities applied for office buildings are available for Parkings too.

In order to fully model a facility in the application, the following hierarchy has been designed:
- Building
- Floor
- Zone / Office
- Workplace / Parking Space
Add building information
By pressing the "+Add Office/+Add Parking" button, the process of adding a new facility to the application is started. The page that opens contains three menu items (Office/Parking Details, Equipment, Floors), but initially, only the one with the building details is available for access. Depending on the case, the fourth menu will be available, namely the one dedicated to the allocation of seats.
For a building, the following information can be added:
- Name of the building
- City where the building is located
- Status - draft or public, depending if the building is fully configured or not. Draft means that the building is not yet visible for the end-user
- Address of the building
- Admins – by default the name of the creator will appear here. There is also the possibility to add more people as admins by simply typing their names and adding them to the list.
- Photo – suggestive photo with the building
- Check-in confirmation - by enabling this feature, all users will be required to confirm all their office check-ins in order not to lose their workplace. If the box is not checked, all check-ins will be automatically validated by the system. The confirmation can be done up to half an hour after the check-in’s starting time
- Recurrent Check-in: is automatically turned on for all buildings in the application, whether they are newly created or already existing. If you wish to turn this feature off, you can disable the flag, which will remove the "Recurrent" button from the Check-In menu tab. When this happens, users will only be able to make day-by-day bookings and will no longer be able to create recurrent check-ins.
- Check-in date offset (in weeks) - the building admin can set the maximum number of weeks in the future up to which an employee is allowed to create a check-in. For e.g, if the written amount is 4, then users may perform a check-in for a maximum of a month in the future. The maximum possible amount which can be written is 53 weeks, meaning a year in the future
- Check-in duration (in hours) - the building admin has the possibility to set the length in hours of a single check-in. He/she can either set a normal 8 hours workday or give other values which must be greater than 1 and smaller than 24
- Building Info: building admins have now the possibility to add information about buildings, in the form of "house rules", who can be helpful for users. In case a building has that information available then an "i" symbol will appear on each building card to symbolize the existence of this feature. In this text box, the admin can write plain text or add links to other webpages
- Time zone - is configurable for each office building and will determine the exact time zone in which all check-ins will be done

After pressing the Save button, the new building is stored in the application and the other menu items become available.
The same fields and steps apply to the process of creating a Parking space except for the Confirmation functionality which doesn't apply to this kind of buildings.
Add equipment to the building
The second step in the building creation process is the one dedicated to creating the Equipment. The building admin can add, edit or delete equipment.
The following details can be added for equipment:
- Name
- Description
- Icon - the most appropriate icon describing the equipment
- Standard equipment - if the configuration is set, the equipment is pre-selected for every place in the building

By clicking Save the new equipment is being created and added to the list of building equipment. In order for the building admin to add more items, he/she must click on ADD EQUIPMENT button and restart the equipment creation process.
The same process applies in the case of Parking Spaces if the Building Admin wants to add special equipment (e.g. Electric charging station).
Add floors to the building
The third menu item allows the management of the floor / zone / place hierarchy.
The process starts by adding floors to the building. The building admin can enter the following information: Floor Name, Level, and a Plan for the entire floor. After entering the desired information, the floorplan can be saved by pressing the Save button. All three field are mandatory.

Add zones to the floorplan
One floor can be divided into several Zones / Offices. This additional step makes it easier for the user to better see the workplace / office information on mobile devices. A Zone should be thought of as the lowest level at which a user should navigate in order to be able to easily book a place. It can be also considered as being an office room if desired. To add a new Zone, just press on the newly created floor, wherever you want to position the zone.
In order to create a new zone, the building admin should select the type of the zone (Free/Allocated), add a name for the zone, decide whether the zone is Enabled/Disabled and upload the zone’s plan (picture format). The Enabled option means that the zone will be visible for the end user. The Allocated option, when activated, requires a list of allocation admins, containing the persons who will take the responsibility for the upcoming allocations. Also, when a zone is allocated, each new place created under it will have, by default, the status set to Allocated. For an allocated zone, the building admin has the possibility to choose a color by entering a HEX code or by simply selecting from the suggested color palette and all the places created in that zone will inherit the chosen color (green is the default color if no color is chosen for an allocated zone).
Additionally, a zone can be assigned exclusively to a specific team, ensuring that only team members can create check-ins for the designated places within that zone. To assign a zone to a team, the building administrator can search for the desired team by its name. Keep in mind that all created teams within the entire company will appear in the search results, so it's important to select the correct one. Zones with an existing team allocation will no longer be visible in the Manage Allocation section, as the allocation has already been completed.

After clicking on the Save button, the building admin can see the locked symbol (key symbol) and the chosen color, in case it is an allocated zone, or the green colored pin, in case it is a free zone, followed by the zone name. The building admin has the possibility to edit/delete a zone as well.
In order to reposition this Zone as a pin on the Floorplan (this will be used as the clickable item for the users to navigate to this level), press the ARRANGE PINS button on the top-right corner of the Floorplan. This transforms the view in an Edit mode where the building admin can simply move the pin, with Drag and Drop, to the desired location. Click on the same button, which now is called SAVE PINS POSITION to keep your settings as displayed in the example below:

Add places to zones
Once the zones have been created, the building admin can proceed with adding places to the map. In order to do that, a few steps need be followed.
The building admin should click on the selected zone, wherever they want to position the place. In the opened pop-up, the building admin can see the zone/department name, color, and the locked symbol, in case it is allocated. In the first section, the building admin can choose whether they want to create a free or an allocated place. They can create free spaces under allocated zones and allocated places under free zones, the default status of the places being inherited from the zone level. The building admin can also assign a place number and specify the name of the zone (room name) in which the place is being created. The room name/ number is associated with a place and therefore must be typed each time a new place is created or when an already created place is edited.
Furthermore, place numbers within a single zone do not need to be unique. This means that there can be multiple places sharing the same number, such as two or three places with identical numbering.
In the second section, the building admin should choose the type of the place they want to create: workplace, cafeteria or recreation. Cafeteria and recreation places cannot be allocated to employees. A new place can have the following properties enabled/disabled, enabled meaning that it will be visible to the end user. The People with disabilities control marks a place as a special place for people with disabilities. By enabling this control, the end-users will see a pin with the wheelchair symbol, which symbolizes the fact that the place must only be occupied by people with special needs.
The building admin can also specify the equipment for the newly created place. The standard equipment is initially pre-selected, but the selection can be modified both by removing standard equipment and by adding other equipment.

For the parking places, the building admin has the possibility to choose either a normal parking place, one with electric charging, or one for guests (a place for non-employees). In the case of selecting the electric charging place type, the building admin can specify the socket types available for that place.

Pressing the ADD button will create the place. The building admin can also edit/delete the created place by simply clicking on it.
If you want to reposition the workplace press the ARRANGE PINS button on the top-right corner of the Zone plan. This transforms the view into an Edit mode where the building admin can simply move the pin, with Drag and Drop, to the desired location. Click on the same button, which now is called SAVE PINS POSITION to keep your settings as displayed in the example below:

Repeat the above steps for adding any number of workplaces to the map.
Please make sure that at least one place was created before making the building public to the employees. Otherwise, that floor/zone won't be visible to the end user as it doesn't contain any bookable places.
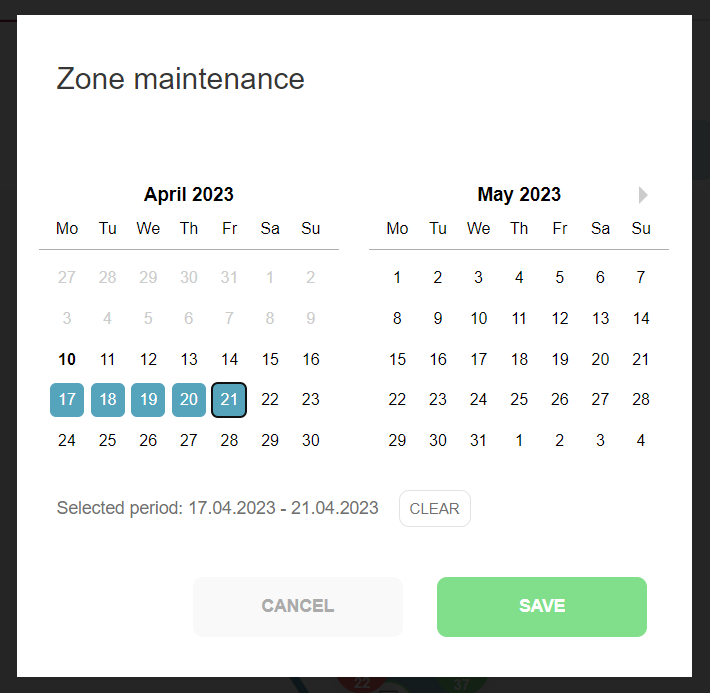
Zone Maintenance Schedule
In the event that a zone becomes temporarily unavailable, there is a useful feature that allows you to schedule maintenance for a specific period of time. This can be done via the "Maintenance" button, located in the Administration view of the zone. Upon clicking this button, a pop-up window will appear containing a date interval selector. You can then select the start and end dates of the scheduled maintenance period. Once the date range has been selected, it will appear below the section displaying the months, and a "Clear" option will be available for resetting the maintenance interval.
Please note that setting up a maintenance schedule will result in the deletion of all check-ins, including event registrations, that overlap with the selected date range, and users will be duly notified of this. Furthermore, it is important to bear in mind that during the maintenance period, check-ins will not be possible in the affected zone.

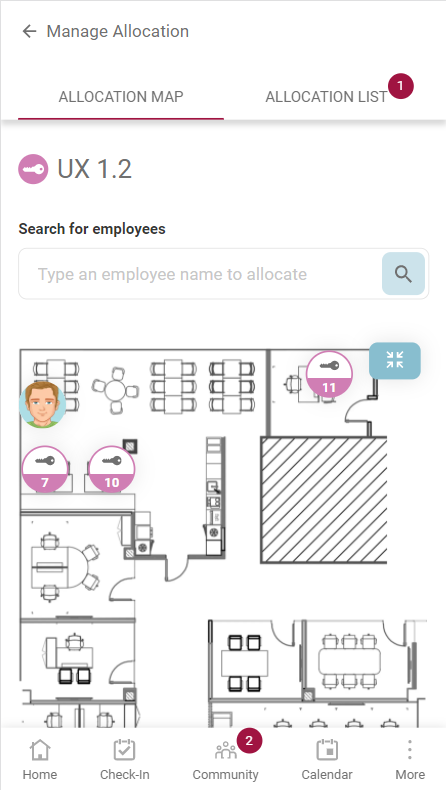
Manage Allocation
The Manage Allocation tab is visible to the users who have the Allocation Admin role for at least one zone in a building. Under the tab, all the buildings in which they are allocation admins are displayed. By clicking on a building’s Manage Allocation tab, a list with all the floors which contain at least one allocated zone is shown. When choosing a floor, the allocation admin can see the zones which were assigned to them and after clicking on a zone, the admin navigates to a view where the allocation process can start.
On the right side of the view, the allocation admin can see the zone map with the locked seat pins and the already allocated places. On the left side, there is a search field, where the admin can search for employees to allocate. There is also the Allocation List, which contains all the allocations made in that zone. An employee can have a maximum number of two allocated places, one for an office building and one for a parking building. The Allocation List can be downloaded in the form of a csv file by clicking on the Download list button.

There are 2 ways in which the allocation admin can allocate a place to an employee: they firstly click on a locked pin and then search for an employee in the search field, or they firstly search for an employee and then click on the desired pin. After the place was allocated to an employee, a new card is added under the Allocation List and the employee’s picture is visible on the floor map. Additionally, the employee is notified of this allocation by email and can see their allocated places in My Profile section.
The deallocation mechanism is bidirectional too. The allocation admin can click on the delete symbol attached to each card from the Allocation List or just click on the corresponding pin from the zone map. After an employee’s allocation is removed, the employee is notified by email.
On mobile, the information is visible under two tabs: Allocation Map and Allocation List. After an employee was allocated to a place in the Allocation Map, their name will be visible under the Allocation List. A bullet is visible next to the second tab's name, showing each time the number of added employees.
Manage Check-Ins
The Manage Check-Ins menu enables the building administrator to remove check-ins for employees/guests who are absent due to personal/medical reasons, freeing up the space for booking. The default display shows today's confirmed and pending check-ins for all employees, but the admin can search by employee name and browse the calendar day-by-day.
The list of users displayed contains all the check-in details and a delete button. When clicked, a pop-up appears to prompt the administrator to specify the reason for deletion (if the selected check-in is not for a guest). The typing of a reason is mandatory. After the deletion is successful, a notification is sent to the user and a success toaster appears.

Edit an existing building
All information added by the building admin when creating a new location can be edited. This option is available on any of the levels mentioned in section Add a new building. Entering the Edit mode allows the building admin to change all the properties that he/she has previously set while creating the new location, including name, address, images, pins location. To access these options, press the Setup button and start modifying the information under Office Details section and then press the Save button in order to modify the building . For Equipment and Floor section there is an dedicated Edit button/symbol which needs to be pressed in order to enter the edit mode. Press Cancel to reset your changes. The same process applies to Parking Spaces.
Remove floorplans
All information added by the building admin when creating a new location can be deleted. This option is available for any of the building levels mentioned in section Add a new building. Entering the Edit mode and pressing the Delete button, or simply pressing the Delete button attached to each building card, allows the building admin to remove the corresponding level information. The same process applies to Parking Spaces.
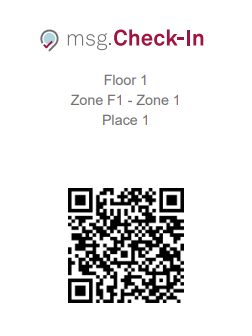
Check-in using a QR code
Building administrators are able to produce Place Stickers tailored for the physical desks located within the premises. These place stickers comprehensively encompass details concerning the specific place's whereabouts, encompassing essential information such as building, floor, zone, room names, and the place number. Beyond these location particulars, the place sticker is enriched with a QR code. This QR code serves as a convenient means to swiftly initiate the check-in process through effortless scanning, enhancing user efficiency.
This introduces a seamless check-in option for employees, facilitated by scanning the QR codes featured on these stickers. The utility of this feature spans across diverse place categories, encompassing offices, parking lots, cafeterias, recreational areas, and allocated places. Building administrators exercise full discretion in choosing the specific places for which QR code stickers are to be produced.
Building administrators should remain mindful that any adjustments to the physical building layout, such as desk relocation or removal, mandate the issuance and substitution of QR code stickers. Equally important, in instances where a place pin is removed from the app, the corresponding physical sticker must be promptly removed from its designated location. This proactive measure is indispensable in averting any inconvenience for employees who might otherwise encounter error messages when endeavoring to scan a QR code that no longer corresponds to an active place pin.
How to get the Place Stickers from the app:
- There is the option to obtain all the QR codes from a zone by clicking the “Download all QR codes” button located under Workplace Management - Zone Edit. This will open a new window (browser's printing menu) where all stickers all present and can be immediately printed or saved as pdf file:


-
Another option is to print the sticker for each particular place. In this case the building admin need to click on a place pin, enter the edit pop-up screen, and then use the “Download QR code” button in the upper right corner:

Optimal Approach for Place Sticker Printing
For the most efficient and professional results, we strongly advise utilizing the services of a print shop for the printing of QR codes. Print shops offer specialized papers designed for seamless adherence to surfaces. To further enhance usability during the printing process, each sticker is thoughtfully outlined with a distinct grey border. This delineation assists print house personnel in employing a guillotine for effortless and precise sticker cutting. By leveraging the expertise and tools available at a print shop, you can ensure the production of high-quality, accurately crafted QR code stickers.