
Community
The Community page is organized into three tabs: Followings, Followers, and Teams.
Following
To Follow a co-worker, go to the Community page, the Following Tab, and start searching the person you want to follow, and press the Follow button. This action will trigger a request that is being sent to the colleague. The respective colleague will be notified of this action and has then the option to approve or decline the following request.

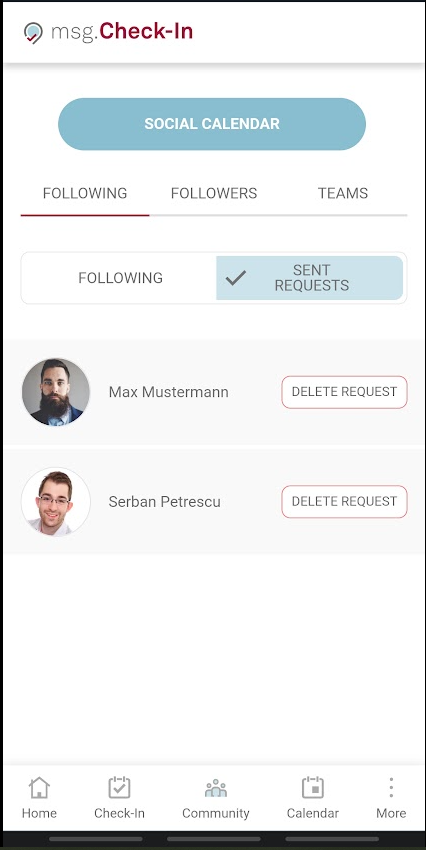
All the pending requests are being displayed under the section Sent Requests and will remain there until the recipient makes an action. If the recipient accepts the follow request, then the card with that user's name will be visible under the section Following. If the recipient declines the follow request, then the sender will be notified of this action and the card with that request will disappear from the Sent Requests list.
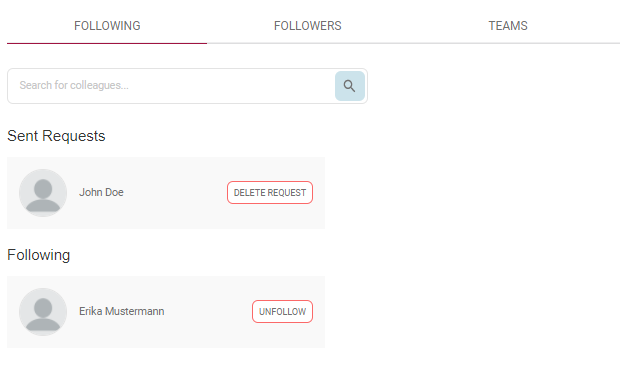
On mobile devices the two lists are being separated into two different tabs with the same names. In order to have access to the desired information you need to choose one of the tabs: Following and Sent Requests.
By accepting your follow request, your colleagues will give you access to see their activity and status within the app. More exactly you may see their daily check-ins and you may find their future plannings by accessing the Social Calendar. Also, in case your colleagues have a private profile, once they become part of your following list, their profile will no longer be private for you.
Followers
The Followers Tab from the Community page displays all the users that are currently following you but also shows all the available incoming requests. For the incoming requests, you will have the option to accept or reject the request. Based on the notification settings under your profile you are being notified via email and/or push about all incoming requests. In case there are more available incoming requests you may also have the option to accept all of them by clicking on the Accept All button. The pending requests are displayed under the Incoming requests section. Once a request is being accepted, that user becomes now part of the Followers list.
The user is also able to remove the previously confirmed followers by clicking on the Remove button next to the corresponding photo. Once a user is being removed from the list, that colleague is also being notified of your action.

Same as for the previous section, on mobile devices the Followers menu is also being divided into two different tabs, making a fine cut between the pending incoming follow request and the list with all your followers.
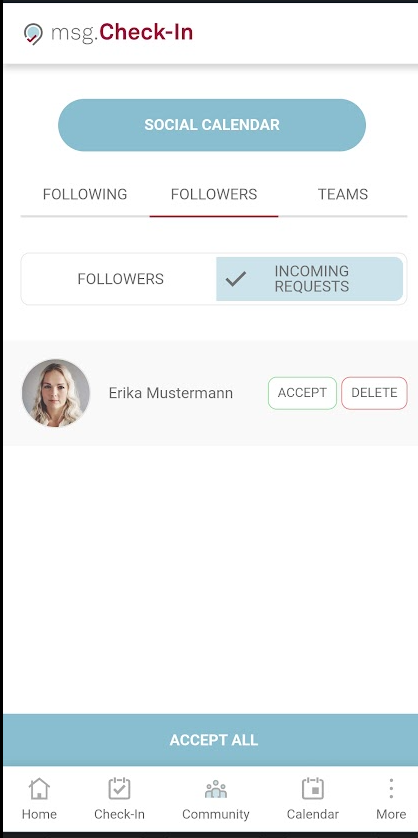
After accepting a follower request from one of your colleagues, if that user is not yet part of your following list then a "Follow back" button will appear on the user's card. By pressing the follow back button, a follow request of that user is being triggered. Once the button is clicked, it disappears and the following request and notification about this action is being sent to the user. In order to see it, you can go back on the Following tab and see the request under Sent Requests.

Teams
Under the Teams tab of the Community page all your teams are being displayed. There can be either teams created by you (Edit and Delete options are enabled), or teams in which you were added by other colleagues (Leave team option available). There is also the option to create a new team by simply pressing the + Create Team button.

Create a team
The Create Team button opens up the team creation view in which the following information can be added: Team Name and Team Members. Team Name must be unique in the application. In case there is another team available with the same name the new added team cannot be saved. In order to add members to the team, the colleagues' names must be typed in the search field and the Add button must be pressed.

Upon saving the team is being created and displayed under the Teams tab. The new added members will now have the status pending marked by the text "Pending members" and by the yellow clock symbol attached to each user picture. They will remain pending team members, meaning that they are not yet part of the team, until they accept the request to join the team. Once the request is being accepted, they will no longer have the status pending and they can now be checked in during the team check-in process. As long as they remain with the status pending, their name will not be available when creating a team check-in. If the invitation is declined, then the user is removed from the team and his information is no longer visible.

In any newly formed team, there is always a designated team owner who holds the authority to modify or delete the team. As the owner, you have the flexibility to alter the ownership, make edits, or completely remove it, as described in the following details:
Change Owner
As the team owner, you have the ability to transfer ownership to one of your colleagues, ensuring that the team remains active and has an administrator even if you step down. This option is available only for existing team members and cannot be assigned to pending members.
Once the ownership is successfully transferred, the selected colleague will receive a notification regarding the change, and you will relinquish your administrative rights over the team.
To initiate this action, simply click the "Change Owner" button and choose another active member from the provided list.

Edit a Team
When editing a team, the following operations are available: adding new members, removing members, and edit team name:

When adding a new user to a team, this member is notified of this action. The added member has then the option to approve or decline this association.
By pressing the Delete button assigned to each team member, this member will be removed from the team, and he/she will be notified of this action.
Once all changes are being done, the Save button can be pressed and the team information is being updated.
Delete a Team
To delete an entire team, the Delete Team button corresponding to the team should be used. This option is available only for the teams created by the logged-in user. After confirming this option, the team is completely removed from the system and all users who accepted the request to join that team are now being notified of the deletion.

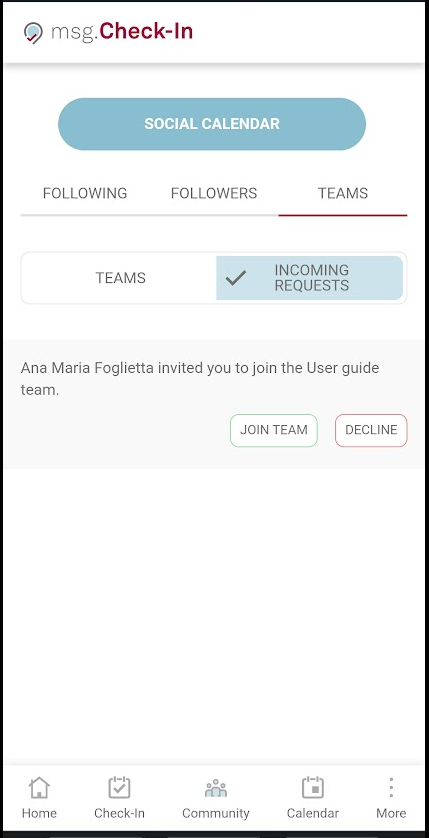
Incoming Team Requests
All available incoming team requests are displayed in the upper section of the page containing two action buttons: Join Team and Decline.

By accepting to join the team that team will become part of your teams lists.
On mobile devices there is also a separation on two tabs between the active available Teams, and the Incoming Requests:
On all mobile devices, on the Community section a shortcut button to the Social Calendar is being visible. By pressing that button, you land directly on the menu Calendar - Social Calendar where all the information about your community can be checked.
Guest management
In case the user has the role of Front Desk Admin, they will see a new tab called Guest Management. Under this section, the user can add guests by typing their full names in the input field and clicking on the Add button. Also, the user can search after a guest's name or delete an entry as well. All the added guests will form the user’s guest team. In case the Front Desk Admin adds new guests during the Manage Members process of an already created check-in, their names will be visible under this section as well.
Behind these entries, there is no active e-mail address associated. It is the responsibility of the Front Desk Admin to notify the users in case a check-in was created on their behalf.
